Winchester 1886
For Big Game

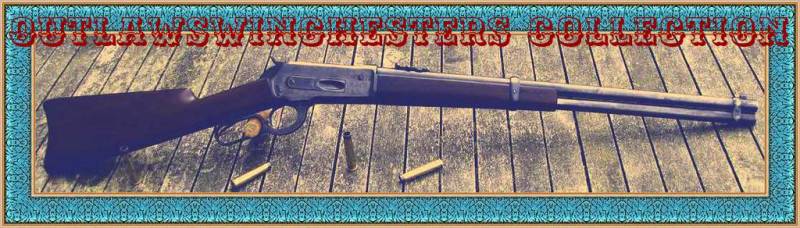
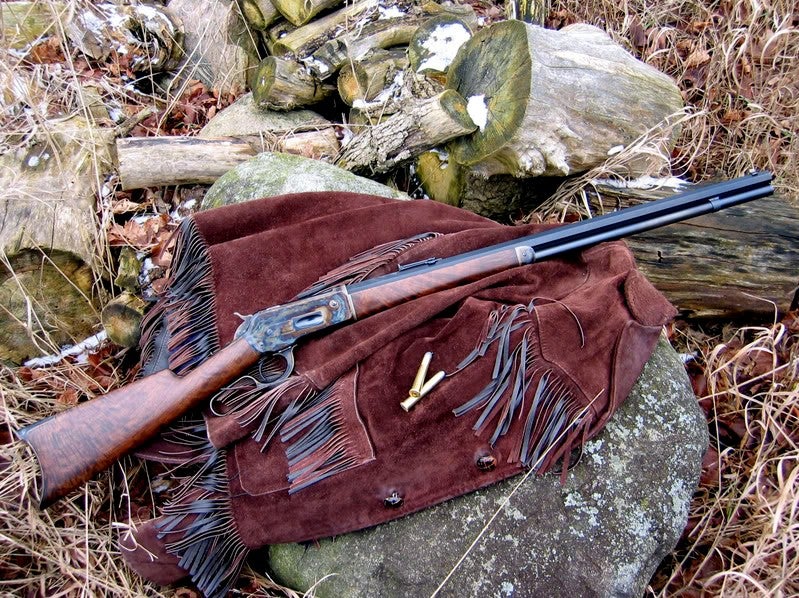
WINCHESTER 1886 LEVER ACTION .45-90 CAL. RIFLE from the OutlawsWinchesters collection


The Winchester 1886
See now also for Colt: http://outlawscolts.jouwweb.nl/
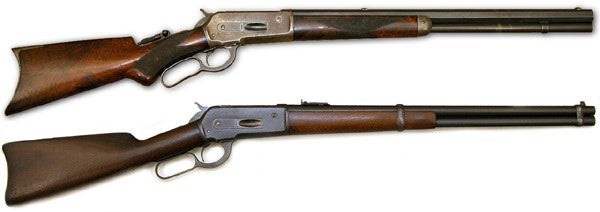
(foto; Winchester 1886 rifles)
Firing massive .45 and .50 caliber cartridges, this rifle was designed to compete with the powerful single-shot rifles of the frontier.
The story of the Winchester levergun goes back to the beginning of the Civil War. In 1860 the Henry rifle was brought forth by B. Tyler Henry. This levergun fired a .44 Rimfire cartridge, held 17 rounds, and was personally purchased by soldiers for battle use against rifles that were much more powerful but only held a single shot.
In 1866 Oliver Winchester purchased the Henry rifle, founded the Winchester Repeating Arms Company, and was smart enough to make Henry his shop foreman. The Henry rifle received a wooden forearm and a loading gate for the .44 Rimfire round, and thus the brass-framed Winchester Yellow Boy" Model of 1866 had arrived.
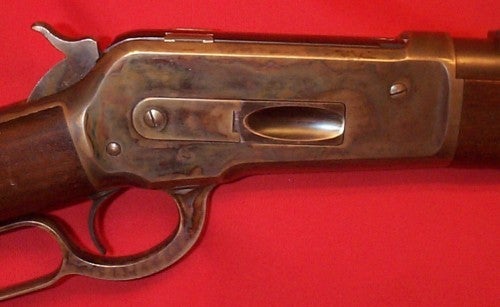
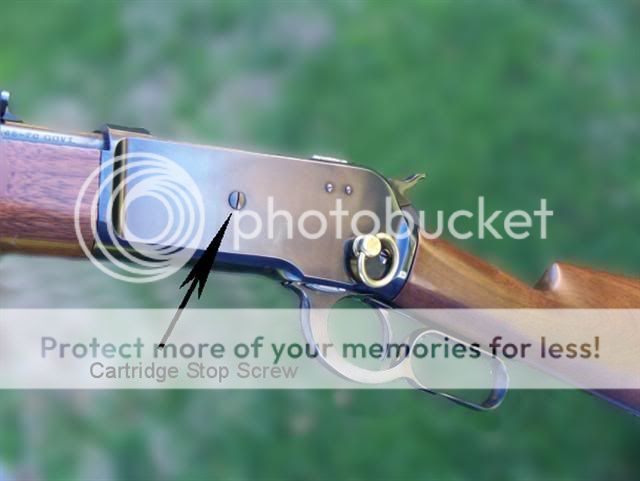
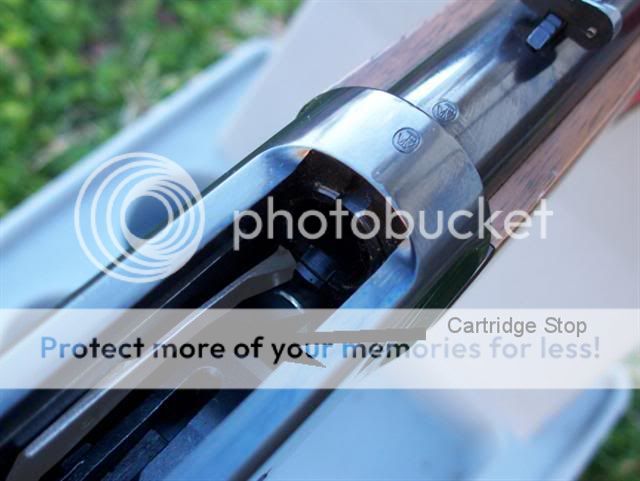
(foto; Receiver study 1886 model)
Seven years later, the 1866 was transformed, with first an iron receiver, and then one made of steel, chambered in Winchester first cartridge, the .44 Winchester Centerfire, or as it was subsequently named, the .44-40.
All three of these leverguns fired pistol length cartridges. The Army adopted the Springfield 1873 Trap Door in the much more powerful .45-70 cartridge in the same year the .44-40 came about. It fired a bullet that was more than twice as heavy at the same muzzle velocity Winchester leverguns were reliable repeaters, but when compared to the Trap Door and its big .45, they were not very powerful.
The Winchester Solution: More Power
In 1876 Winchester unveiled a new levergun at the Philadelphia Centennial Exposition. The Model 1876 was chambered in a cartridge that was much more powerful than the .44-40 but not quite up to the .45-70.
The 1876 was basically a larger Model 1873 chambered in .40-60, .45-60, .45-75 and .50-95. The latter two rounds sound very powerful until one realizes that they were loaded with bullets in the 300 gr. weight class instead of the 400 to 500 gr. ballets used in other .45s and .50s.
Winchester's son-in-law, Thomas Bennett, wanted to bring forth a more powerful levergun, one that would handle the .45-70. He heard of two brothers living in Utah who were rifle designers. So, Bennett went to Ogden, met the Browning brothers, and purchased two new rifle designs, one destined to be the 1885 Single-Shot and the other the levergun that would become the Model of 1886.

(Model 1886 .45/90 Cal.)
By today's standards, the Winchester 1886 was a huge rifle weighing about nine pounds. Its extremely smooth action carried over to the miniature levergun that would come later, the Winchester 1892.
The 1886 debuted in the era of black powder cartridges and would prove to be strong enough to make the transition to smokeless powder. In fact, the only alteration necessary was to change the barrel to nickel steel in order to handle the higher velocities of jacketed bullets.
The Model of 1886 was manufactured for nearly 50 years from 1886 to 1935, and was considered the rifleman's rifle in the 1880s and 1890s. This great levergun chambered nine black powder cartridges. In addition to the .45-90, original chamberings were in .45-70 and .40-82. The Model 1886 could also be found chambered in the big fifties, .50-100 and .50-110, as well as .40-70, .40-60, .38-70 and .38-56. Its last chambering before its demise in 1935 was the smokeless .33 Winchester.
One year after it was removed from production it came forth in its "modernized" version, the Model 71 in .348 Winchester. During its production run the 1886 would be made in several versions: full magazine, half magazine, octagon barrel, round barrel, rifle and carbine to name a few.
100 Years Later
In 1986 Browning brought forth the Browning Centennial, a commemorative of the Browning-designed Winchester. A nine-shot .45-70 with a 26" octagonal barrel, the Browning Centennial featured a straight grip stock, crescent shaped butt plate, buckhorn rear sight with a bead front and was offered in two versions: a standard Grade I with blued finish, and a High Grade with engraved receiver and select walnut. Total production was 7,000 of Grade I and 3,000 of the High Grade version. There were also 2,000 High Grade Montana Centennial rifles issued the same year.
The Browning recreations of the 1886, as well as the earlier offered Model 1892s in .357 and .44 Mag., were made by Miroku in Japan. In 1998, Miroku began producing the 1886 under the Winchester label. Each successive year has seen the addition of a new, limited-edition version to the Miroku line.
Thus far we have seen a standard rifle, a take-down and an extra light model. The latter weighs slightly over 7 lbs. with a half magazine, 22" tapered barrel, and shotgunstyle butt plate. For the year 2000, there will be 4,500 Extra Light .45-70 Model 1886s produced.
The standard rifle is the 1886 take-down model. Take-down models of original leverguns command premium prices today. The concept of a take-down makes it very easy to transport the levergun without the box shouting "rifle inside." Also, when black powder loads are used, cleaning is made much more convenient by being able to remove the barrel from the action.
Taking down the Model 1886 is quite easy and quickly accomplished. Simply move the lever completely forward on an unloaded gun, and pull up on the latch at the end of the magazine tube. This latch lever serves as a handle to unscrew the magazine tube and remove it. Once this is accomplished, the barrel is twisted and unlocks itself from the receiver. Takes less than a minute to accomplish.
The take-down model has a 26" full octagon barrel with a full length magazine tube. Both the receiver and the operating lever are finished in a deep black-blue color. The butt stock and forearm are both of good quality walnut. The butt stock features a crescent shaped butt plate that does not match up well with today's full-house .45-70 loads! Capacity is eight rounds.
Sights are a bead front and a buckhorn rear, which I quickly replaced with a Williams receiver peep sight. As eyes get older the standard rear sights on lever guns become harder and harder to see, but a good receiver sight allows the eye to focus on the front sight while centering it automatically in the rear aperture.
I am confident that I can hit at any distance and am likely to shoot the Model 1886 .45-70 at live targets using this sighting setup. This is not a long-range combination but neither is the .45-70 a long-range cartridge.
Big, Mean & Nasty
The .45-70 has a well-deserved reputation as a game-getter, especially when the game being taken is big, mean and nasty. Specialty loads such as those offered by Buffalo Bore and Garrett Cartridges will surely handle anything that walks on this planet. Garrett's main loading now is a 530 gr. Hammerhead bullet that is designed to protect the user against anything. This is a hard cast flat-nosed bullet that clocks out of my Winchester 1886 at 1,575 fps. This load will take anything.
Buffalo Bore's offerings for the .45-70 are also designed for really big stuff. Their hard cast offering is a 430 gr. LBT bullet at 2,000 fps. This is backed up by a 350 gr. JFP at 2,200 fps, and a 405 JFP at 2,050 fps.
All of these heavy loads shoot well in the 1886 with the 350 gr. Buffalo Bore being a real tack driver. Recoil with all of these loads is stout and accentuated by the crescent shaped butt plate on the Winchester 1886.
Cor-Bon's .45-70 offerings consist of a 350 gr. JFP bonded at a little over 2,000 fps that not only shoots well but also is easy on the shoulder, and a 405 gr. Penetrator that is designed to do just what it says, penetrate.
Unfortunately, the throat on my 1886 is so tight as to not allow the Cor-Bon .45-70 405 gr. Penetrator to chamber. Garrett's 530 gr. Hammerheads also chamber with difficulty.
Hard-Hittin' Handloads
The Winchester 1886 is very versatile with the ability to handle many different types of loads with target accuracy. Consider these: Northern Precision's 400 gr. JFP over 54.0 grs. of H322 does 2,025 fps and shoots into 1" at 50 yards. For anyone that reloads for any big game rifle, Bill Noody of Northern Precision is a good man to know. All critters are definitely not equal and Noody can match the toughness of the jackets of his bullet to the toughness of the game being hunted.
Speer's 400 gr. JFP, 50.0 grs. of H322 at 1,830 fps; Bull-X's 405 hard cast, 48 grs. of AA2495BR at 1,625 fps; and Fusilier's 500 gr. FNGC, 31.0 grs. of IMR4198 at 1,575 fps, all will put three shots into 1" or less with iron sights at 50 yards.
Black Powder: Comfortable And Traditional
The Model 1886 was originally a black powder levergun, so it was not only natural to use it with black powder it was also a whole lot more comfortable to shoot loaded the old traditional way. Lyman's 420 gr. plain based cast bullet lubed with Lyman's Black Powder Gold was loaded over both 62.5 grs. of Goex Cartridge black powder and 53.6 grs. of Clean Shot, the black powder substitute. The former load clocked out at 1,200 fps while the latter came in at a most satisfying 1,400 fps. Both loads shoot well.
|
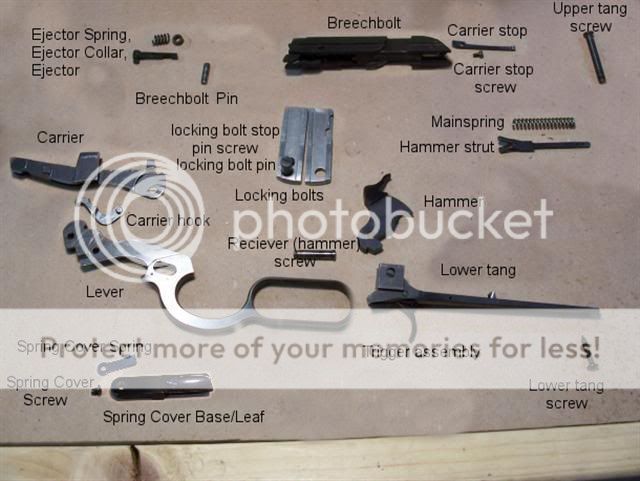
Fieldstripping The Winchester/Miroku 1886 Tutorial
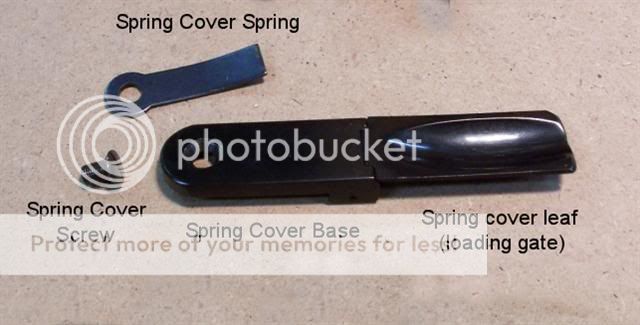
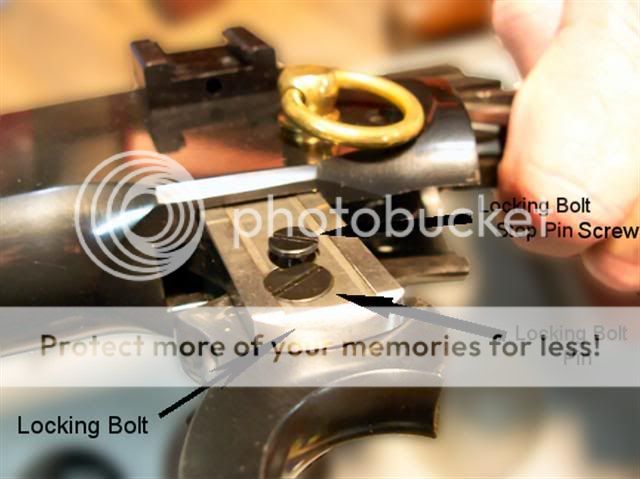
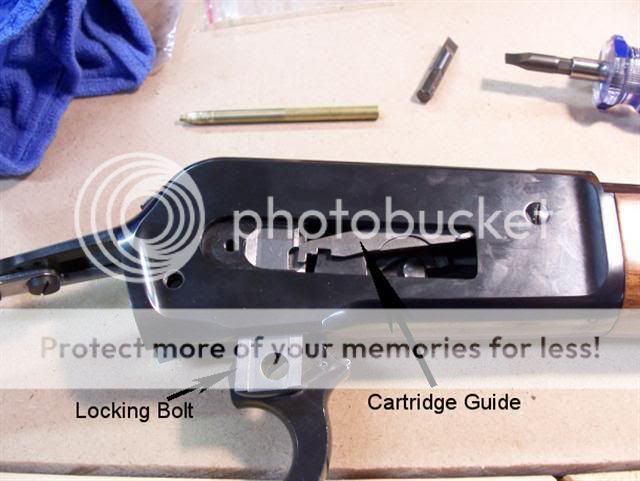
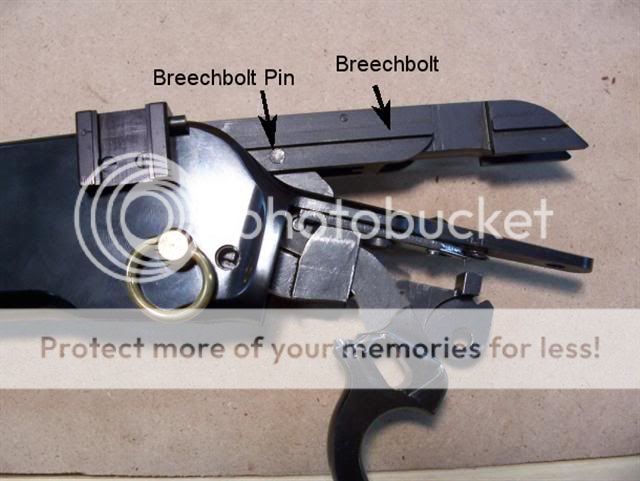
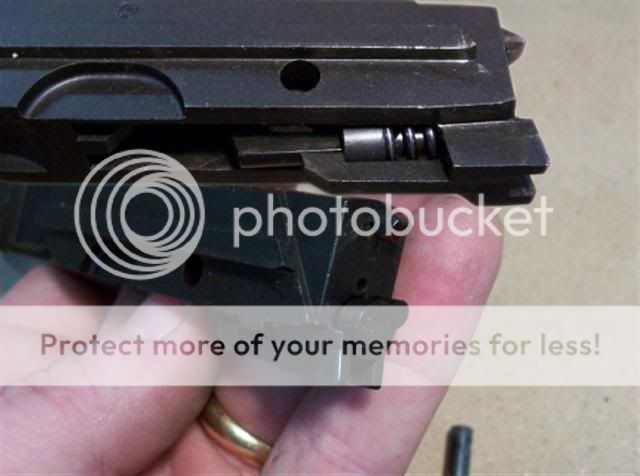
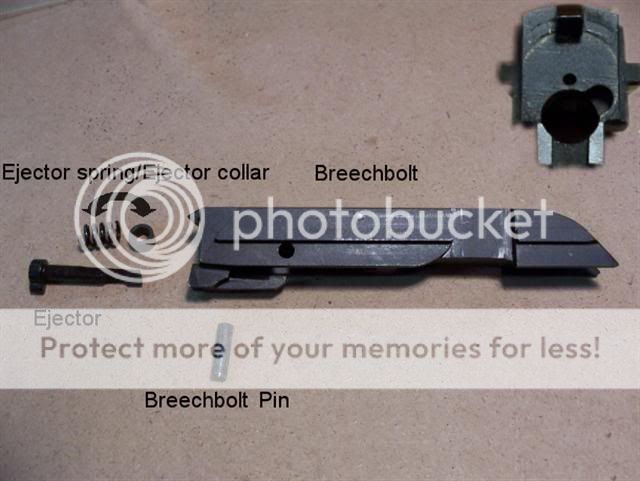
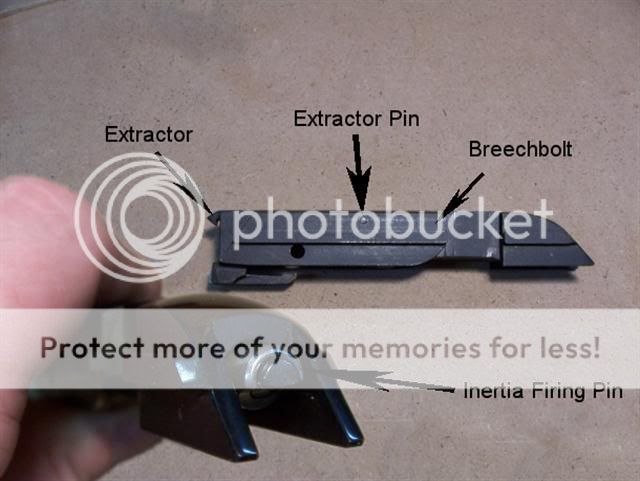
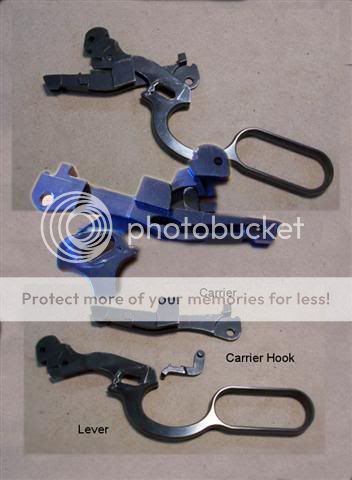
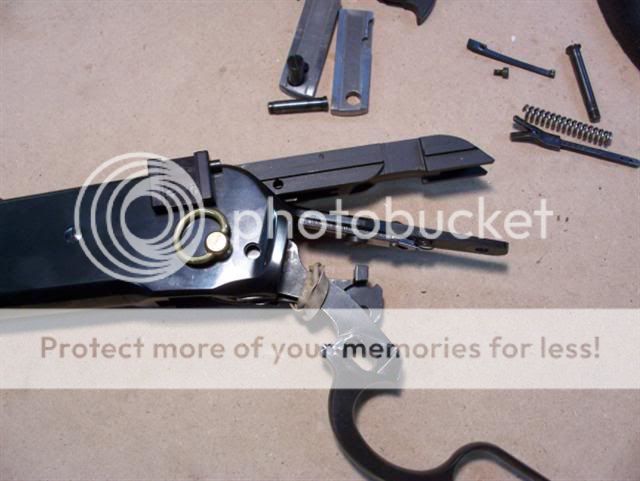
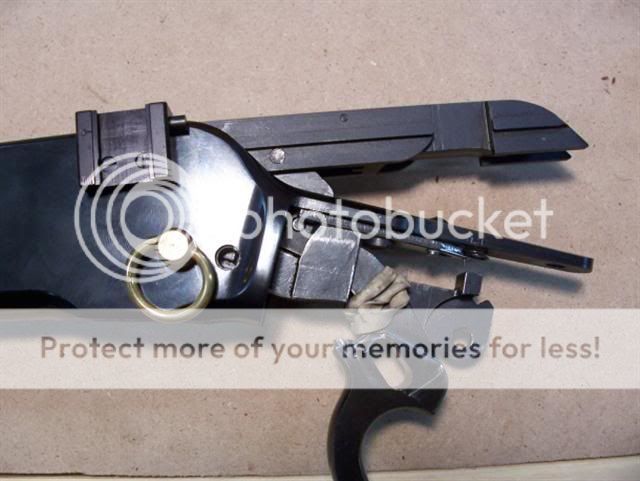
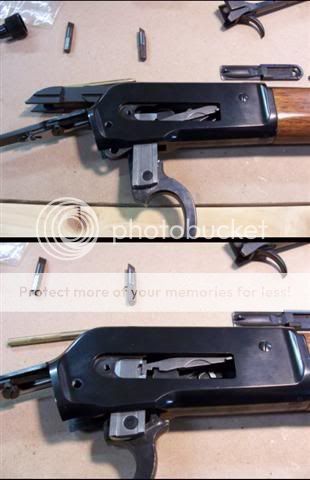
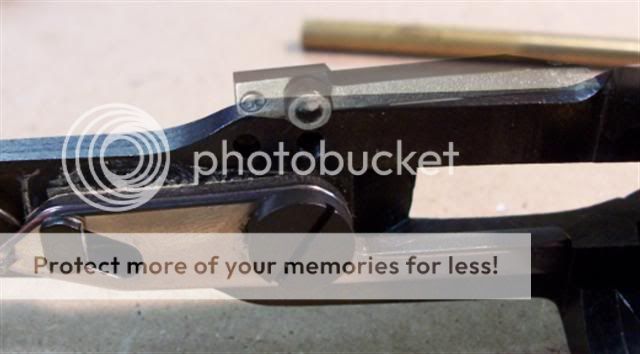
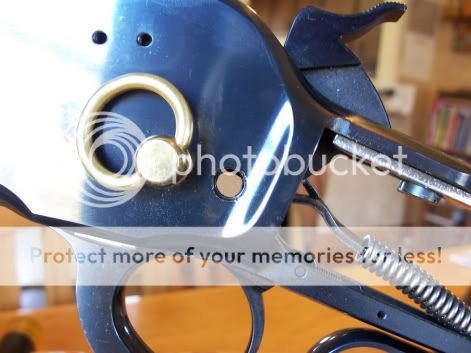
<!-- / icon and title --><!-- message -->  Field-stripping The Winchester/Miroku 1886 Tutorial By: Steve Barrett The following is not new information, or information that cant be had from a firearms disassembly book, but I have not found any information with pictures of the process as far as field-stripping the Winchester/Miroku 1886. I also ordered a video from AGI(American Gunsmithing Institute) on the 1892/1886 Winchesters. I am already familiar with the 92 design, so I bought the video just for the 86 material. The video mentions nothing or shows nothing on the procedures of field-stripping the Winchester 1886. I thought it might be helpful to those who own these fine leveractions to have a field-stripping tutorial, (some body's gotta do it! P.S. This contains lots of photos and may load up slow, so please be patient STEP ONE: Remove the upper and lower tang screws and pull buttstock straight off the rear of the receiver. The upper tang screw goes all the way through and screws in the bottom tang. The lower tang screw is a wood screw. 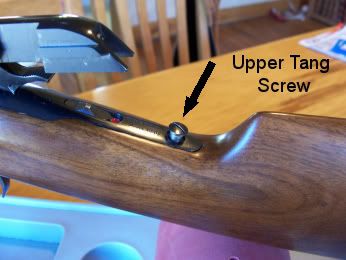 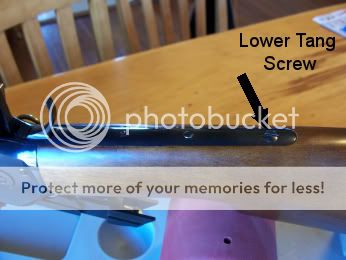 STEP TWO: With the action closed pull the hammer to rear and remove the receiver (hammer) screw. You want to captivate the mainspring before removing the receiver (hammer) screw. This coil mainspring is strong and may fly to the next room if not held in place. You can use a paper clip or similar item to hold the mainspring in place. 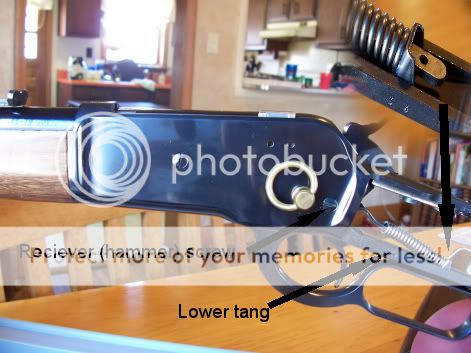 STEP THREE: After removing the receiver (hammer) screw, open the lever and pull the lower tang straight back out of the receiver. At this time the hammer will drop out as well. Pictured below is the hammer and lower tang assembly. The trigger assembly was not taken apart 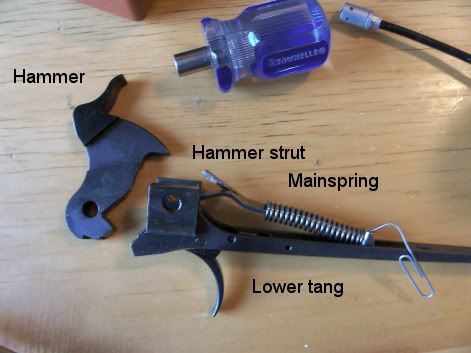 __________________
<!-- / sig --><!-- edit note -->
[SIGPIC]https://i104.photobucket.com/albums/m193/stevensavage/avatars/reloadnPalacescriptresized.jpg[/SIGPIC]
Last edited by steveb; 01-13-2007 at 10:37 PM. |
|
 |
<!-- controls --> <!-- / controls --> <!-- / controls --> |
 01-13-2007, 10:26 PM <!-- / status icon and date -->


(foto; Winchester 1886 rifle)
|
WINCHESTER MODEL 1886
These were produced from 1886 to 1928 |
|||||
|
YEAR
|
SERIAL NUMBER
RANGE |
NUMBER OF MANUFACTURED BY YEAR
|
YEAR
|
SERIAL NUMBER
RANGE |
NUMBER OF MANUFACTURED BY YEAR
|
|
1887
|
1 -- 3211
|
3211
|
1909
|
147321 --148238
|
917
|
|
1888
|
3212 -- 14278
|
11516
|
1911
|
148239 -- 151130
|
2801
|
|
1889
|
14729 -- 28577
|
13848
|
1912
|
151130 --151623
|
493
|
|
1890
|
28578 -- 49723
|
9823
|
1913
|
151624 -- 152948
|
1324
|
|
1891
|
49724 -- 63601
|
13877
|
1914
|
152949 -- 153860
|
912
|
|
1892
|
63602 -- 73816
|
10214
|
1915
|
153861 --154454
|
594
|
|
1893
|
73817 -- 83261
|
9444
|
1916
|
154455 -- 154553
|
99
|
|
1894
|
83262 -- 94544
|
11281
|
1917
|
154554 -- 154980
|
427
|
|
1895
|
94545 -- 103102
|
8557
|
1918
|
154981 -- 156388
|
1407
|
|
1896
|
103103 -- 109671
|
6568
|
1919
|
155389 -- 156220
|
832
|
|
1897
|
109672 -- 113998
|
4366
|
1920
|
156221 -- 156931
|
2290
|
|
1898
|
113999 -- 119193
|
5194
|
1921
|
156932 -- 158716
|
1785
|
|
1899
|
119194 -- 120572
|
1378
|
1922
|
158717 --159109
|
392
|
|
1900
|
120573 -- 122835
|
2262
|
1923
|
159110 --159338
|
229
|
|
1901
|
122836 -- 125731
|
2895
|
1924
|
159339 -- 159361
|
23
|
|
1902
|
125732 -- 128943
|
3211
|
1925
|
159362 -- 159409
|
48
|
|
1903
|
128944 -- 132214
|
3270
|
1926
|
159410 -- 159413
|
4
|
|
1904
|
132215 -- 135525
|
3310
|
1927
|
159414 -- 159421
|
8
|
|
1905
|
135526 -- 138839
|
3313
|
1928
|
159422 --159441
|
19
|
|
1906
|
138841 -- 142250
|
6724
|
--
|
159441
|
Last serial number .
|
|
1907
|
142251 -- 145120
|
2869
|
--
|
--
|
--
|
|
1908
|
145121 -- 147320
|
2199
|
--
|
--
|
--
|
|
--
|
--
|
--
|
--
|
--
|
--
|

Maak jouw eigen website met JouwWeb